Thursday 28 February 2013

New Item in my ETSY Shop! (this is a sticky post)

A while ago now I wanted to teach a class to Zentangle.  I needed to be able to cater for all abilities and I really wanted the class to take home their usual 2 completed cards.  The patterns I am selling in my shop today are the designs I made for my class to practice Zentangling plus a few more!!! 10 designs in all to be precise.

But I didn't stop there....oh no.....  There was a lady in my class who didn't really take to Zentangle and when I wanted to do another class I had to put my thinking cap on and I came up with 2 totally different ways to use these card patterns.  You can use your background stamps and your patterned papers to make these cards too!


So if you like what you see in this photo and on the video below then click on the link at the bottom of this post to visit my ETSY shop and purchase your 10 blank card patterns, 5 Christmas and 5 all Occasion designs, full written instructions and the links to 14 video tutorials that will ensure you make beautiful cards time after time whether you chose to Zentangle, Stamp or Paper Piece to complete your card!  I am pretty sure that there are other ways to use these patterns and I will share them with you on my blog.


10 Card designs ....infinite possibilities!

I am making this a sticky post for a while.  You can never have enough advertising I say!!!

Thank you for popping by x

Please Click Here to Visit to TheCraftProjectShop!


Wednesday 27 February 2013

WOYWW 195

The sun is finally coming out on the East Midlands after a series of grey, grey days!

On my work desk today - after I unburied it from my son's art homework are some cards I made for my previous Trash to Treasure post.  There is a 'how to' video if you care to know more and if you like the cards then please leave me a comment on that post as I will be drawing a winner on my next Trash to Treasure Post.


Next along is my finished fairy from last weeks post and one of my first ever scrapbook albums.


You may remember I was wondering how to colour my fairy drawing last week.  I used Distress Inks in the end and I am happier with her face after a little tweak or two before I began colouring her in.  As you can see I am a messy worker and kept dragging my hand through the puddles of ink on my messy mat.  I may have to paint in some foliage although I am toying with the idea of copying her and decoupaging her.  Then I could use one of my strip dies to make a real 3D autumnal leaf background.


This morning I was putting away a couple of layouts and stopped to have a look at one of my first ever scrapbook albums.  Although we make these pages to record and preserve our family memories it is funny how they also become a history of scrapbook products too!!  This one has mulberry paper on it, pre cut Christmas trees well before the popularity of Cricut or Spellbinders!  I remember printing my text onto vellum as I definitely wasn't ready to show my handwriting to the world back then and the title was reverse printed on my computer and then hand cut!  A real labour of love.  I even made the ski embellishments and pencilled in the ski tracks!


What about the papers we bought way back then too!!!!  A bit like the fashions we wore back in the day too!!!  Ripping and tearing was in I see from this layout and I remember buying sheets of printed letters ( I probably still have the rest of the sheet somewhere in this room.  I made pockets from the paper - In fact as I look at my pages I made a lot of my embellishments in the early days and I haven't lost my love of doing that.

Hope you are all having a fun day and I am off now to desk hop for a while so see you soon.  If you happen this way on a Wednesday and haven't heard of WOYWW then follow this link to find out more.

Thanks for popping by x

Tuesday 26 February 2013

Tag Tuesday Alphabet - H and D

Is it Tuesday again already!  How time flies.  I think it is an age thing. ;-)  Here are my tags for this week and finally I am all caught up!  

My D 'catch up' tag is all bejewelled and one side of the tag as black pen on white card and on the other side has white pen on black.  This was quite fun to try and makes you think a bit more about what you can do with your Zentangle patterns.  The patterns for this tag are from the top - Demi, Daggerly, DL Sunray and Drip Drop.


My H tag was entirely worked on Black and it looks very striking on the red background.  The patterns are on the left - Hypnotic, the ribbon is Half Onions and on the right of the tag is Hibred.  Some of the pattern names are fab - Who knew Half Onions wouldn't make you cry!!!


As I promised last week this is the back of all my tags so far.  I am making a lovely Distress Ink Rainbow and I have recorded all the pattern names so that I can use them again one day.  I have a plan to display my tags but I am keeping that under wraps for the final week of this fun Tag Alphabet.

If you like tags and want to see what others have been making for their Tag Alphabet please follow this link to Tag Tuesday.  I may well see you there!!

Oooo mustn't forget this link - If you like Zentangling or want to try it then this is the place to start - a great reference of patterns with full tutorials.

Thank you for popping by x

Trash to Treasure - No 4 (a smidgin' late!)

I wanted to post another video so this is a little later than I wanted it to be.  Today's Trash to Treasure post uses up some things I know you are going to have.  That last little bit of ribbon off the roll that is just too pretty to throw away!  What do you do with it?  I put it all in a tin because it might be useful....one day!  Today is that day and I am emptying out my ribbon scrap tin to see what I have.


And this is what I made.  I can lay claim to using another potentially trash item as these cards were both made with scraps of card and paper out of my (bursting at the seams) scrap box.


These cards are easy to make and can help you use up all those bits you have been saving!  Most crafters I know have a bit of a hoarder habit!!!!  So I think your going to like these.  Fingers Crossed x

Here is a video how to......hope you enjoy it and give it a go yourself.


The winner of the Trash to Treasure No 3 card was..........

Mo!

Thanks again for the lovely feedback and I will be doing another draw for  one of these ribbon cards on the next Trash to Treasure post.  So if you want to win one of these cards then please leave me a comment here.  What do you do with your ribbon scraps?

I have delved into my ribbon scraps before so here are a couple of links from past posts you might like take a look at if you have lots of ribbon scraps squirrelled away.


Thanks for popping by x

Wednesday 20 February 2013

WOYWW 194

Is it that time again already!!!!!  a bit later posting this morning as we didn't have to get up for school!

On my desk today are the results of yesterdays spot of Zentangling - sneak peak as this is a couple of letters ahead in the Alphabet.  It was letter G over at Tag Tuesday yesterday.  There are the finishing touches still to go so it is not an entire give away!


I also had another go at fairy drawing.  I am torn between colouring her with Distress Inks or my Pro Markers but I hope to finish her off today - I want to have another go at her face as something is not quite right - I think it may be her left eye, cheek area.


I was busy videoing last week and have some more to do today.  As you can see I keep the camera shot area all nice and clear and then everything else just piles up around me!! What a mess ;-)


I might have to tackle that mess a bit before I start again or there may be a video on You Tube featuring my project being swept away on an avalanche of crafting stuff!  I bet I could find a sound effect for it!

Last week I had a notice from You Tube to say I had infringed someones copyright.  It was a bit of a shock to a newbie and I had visions of law suits and massive claims flash before me!!!!  Thank goodness for the internet I say - a quick search and I could breath easily again!  I don't know why people spend their days looking for ways to scam folk......well .....of anything and everything really.  Just think what good they could actually do if they turned their minds to bettering the world.  I want to say a big thank you to anyone on the internet that shares their knowledge to help others.  I happened upon a forum that had an explanation and a solution to my dilema posted and as a result I was able to quickly sort it out.

Happy WOYWW to you and I hope you have a week full of time to craft.  If you want to look around other folks desks around the whole world then just follow this link to Julia's as she has all the links you will ever need and the welcome is always warm where ever you decide to hop!

Thank you for popping by X

Tuesday 19 February 2013

Tag Tuesday the Alphabet continues....


Here are my tangle tags for this weeks Tag Tuesday - I have G and the catch up letter C.  I am really glad I decided on this theme for my Alphabet of tags as I have been having great fun finding new patterns to try out.  One more week and I will catch up with my late tags!

The C tag Patterns are...... on the right - Camelia,  on the top left - Chemistery, bottom left Candle Glow and my favourite on this tag is the pretty ribbon pattern - Chainlea.

The patterns on the G tag are top right - Gingham and bottom left - Girdy.  I love the 3D look of this pattern.  Makes you feel like you are at the top of a tall structure looking down into the depths!  I tried out the cute stamps my Mum gave me this Christmas from Craftwork Cards that are designed to stamp letters on card candy - cool!  I can see lots of used for these - Thanks  Mum x

Next week when I catch up with my final missing letter I will show you the backs of my tags so you can see how I am cataloging the patterns I am using and how my Distress Ink rainbow is taking shape!

I am finding this project very therapeutic indeed - there is nothing like concentrating on a pattern to free your mind from day to day stuff for a while!  Who needs therapy when you have art????  I have just looked that up on the internet to see if I can claim that as a quote!!  I found out that art therapist is a job so I think that proves my quote - I can't find that anyone has it listed as a quote (time will tell) but in the mean time do I have to be quoted to make it a quote?  For it to be more than a sentence in my blog.......ouch I think I need more art!

Who needs therapy when you have art - Helen Allen

You can quote me on that :-)

Thanks for popping by X

Fabulous Fashion!

Yesterday I went to the NEC and whilst looking at all the lovely crafting goodies coming our way this season I spotted these and had to share.  I would so love to tackle a project like these!!!!


Paper weaving taken to another level by the tallented Die Cuts With a View team (DCWV)....and if you like the front.....


......Don't you just love the back!  I am sorry my photos don't really do these paper sculptures justice as they are taken on my phone but I think you can see the fabulousness that really shows what you can do with a pretty piece of card stock!!!


What about this very vintage day dress?  Loving the frills and flowers and the pretty prints!  So feminine, such a creative use of card stock.


This one was my favourite.  I love peacocks and the gorgeous colours of their tail feathers.  This paper peacock was stunning.  The artists captured the iridescence of the feathers with DVWVs beautiful papers and glittery highlights. Truly inspiring work. Well Done DCWV.  Love it - Took my mind off my aching feet and my complaining shoulders!

Thursday 14 February 2013

Happy Valentines Day!

Happy Valentines Day to you all.

I spent yesterday making a romantic present for my hubby and I am going to share it with you as I want to enter it in the Simon Says Stamp and Show Challenge.  This weeks theme is Messy!  Well I think I could have entered anything that I have ever made into this one as I always make a mess and always end up creating in that last postage stamp of space left on my desk.  If I paint or ink I get it everywhere but somehow it all seems to turn out right in the end.  I hope Ivan likes this - I know it is a bit romantic looking but I have been making him little heart love tokens for quite a few years now and I thought I would give him somewhere to hang them up!!  And I made him a new heart to add to his collection.  I am so happy he is my Valentine and has been for 30 years!!!!  Ooooo can I really be old enough ;-)


I decorated a clipboard to match a Valentine tag I made last year (too late for Valentines so I have been keeping it safe!)


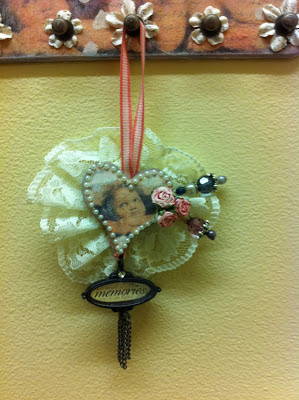
 I used some hitch posts that I have been saving as I they were out of production for a while and I am so glad that Tim announced they were back as I find them so useful.  Hanging from one is the cute little love token I was talking about.


I have used the same image transfer technique on my tag and on my clip board.  I love doing this even if it is messy messy messy!


Lots of lovely romantic embellishing going on - I am not sure Ivan will be showing this to the lads!!!

I decided to show you just how messy I am and I have posted a video fast forward of how I made a Valentine for my Valentine.


One confession to make before I post this and link to Simon Says Stamp and Show.......I haven't tidied up yet!!!!  That won't surprise my Valentine at all ;-)

Have a lovely day and thank you for popping by x

Wednesday 13 February 2013

WOYWW 193

Hello, Hello, How is everyone today?  I am feeling sleepy and underdressed to be visiting but I think you won't mind a pink fluffy visitor....well at least until I have had my breakfast....add hungry to the list :-)

On my desk today there seems to be lots of colour.....


I am working on patterns beginning with the letter D for my Tag Tuesday Alphabet Tags.  I was a bit late starting the challenge but I am catching up and enjoying learning new Zentangle patterns in the process.  I am using my Distress inks to back each of my tags so I end up with a Distress ink rainbow when all 26 tags are finished.  The stack of inks are waiting for me to colour the rest of the backing tags as you can see I have already worked on the reds and pinks.  Also on my desk are the final 3 ink pads I got in the post last week that complete my collection....Yippeee!!!  I think I am going to collect the stains next as I love using them to colour the edges of chipboard and splatting them.  If you have never splatted a Distress Stain I say do!!!!  Don't wear your bestest clothes though and splat where there are no treasured works of art!  But it is a really satisfying thing to do - therapeutic even!  I don't get out much ;-)


Further along my desk I have two layouts waiting to be journaled upon and put away and one Tinkerbell card I need to find a home for.  I might frame her and hang her on my wall.  She is resting on a great teach yourself to draw fairies book.


This is a layout I took all Saturday at the crop to complete - I think I talked a little bit and drank coffee a little bit and ate a little bit too!  This layout is of me and my little bro in our school photo.  I have no idea why we had a fishy backdrop but I am glad we did as I got to use a couple of the Yummy Graphic 45 Tropical Travelogue papers.  Check out those fabulous felt flowers in the corner they were courtesy of my pal Deb who has a fab new die and aren't they just perfect (Thanks Deb x)


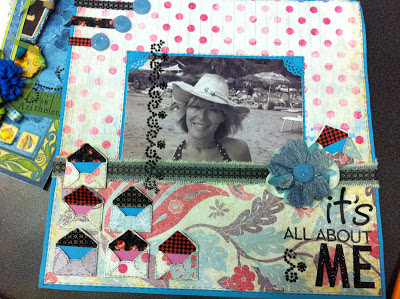
And finally the layout I managed to complete at last months crop!!!  See the little envelopes.  I am going to write things about me in them......eventually.  I have to thank another friend for those - Joy was having a clear out and I espied a punch that makes these darling envelopes.  How come everything is so much cuter small????  I know I would be ;-)

I have been since we last met.   I may be making up for the chatting at the crop!!  I has a making up of card samples and packs as I taught Friday Night.  I posted my 3rd Trash to Treasure post and then posted part 2 with the card I am going to give away pop along and comment if you want to be in it to win it!  I made a video tutorial for that one if you want to take a look.  I posted to Tag Tuesday and I finally got my second pattern of 10 card designs and 14 videos into my shop yesterday!  No wonder I am tired this morning...phew.  Today I will be valentine -ing and then back to the tutorials for my third shop project which I had such lovely feedback for  last week - thank you so much.   Callum was 14 yesterday and he loved his Pyramid Mini - especially as he found treasure as he opened it up!!  Isn't it funny how some weeks you seem to coast and some you just don't know were you managed to fit it all in.

Well I suppose I really shouldn't inflict myself you without being a bit presentable so I had better post this and see what number I end up at this week.  Then I am off to get dressed before I come visiting.  I might even put on some lippy!

If you are wondering what this post is all about and why I am describing what is on my desk today then you really do need to follow this link to Julia's desk to find out more!

My desk is your desk ........ or should that be ........Your desk is my desk!!!

Thanks for popping by x

Tuesday 12 February 2013

Tag Tuesday Alphabet


Hi everyone.  Here is my tag for this weeks letter F and a catch up letter B tag.  All the main patterns on each tag begin with their letter.  F Tag has examples of Funls, Flukes and Flutter Tile and B Tag has Bales, Black Box, Boomerangs and Barberpole.  I am really enjoying trying out some new Zentangle Patterns.  If you are looking for a great library for hundreds of patterns and tutorials then follow this link!

This weeks F Tag has added flowers and bling and is mounted on one of the new Distress Ink Colours 'Picked Rasberry' - yummy and the B tag just had to have Butterflies and Bling!! It is mounted on another new colour in the Distress Ink range 'Shaded Lilac'.

I am pleased to announce I finally completed my collection of Distress Inks this week and am feeling the need to start collecting the Distress Stains.  I am finding them very useful for inking the edges of things and I also love to splat with them.  Very therapeutic at the end of a stressful day.  Don't ever splat in a white blouse though! ;-(

If you just happened by then I should let you know I am part of the Tag Tuesday Team and for 26 weeks we will be working on Alphabet tags.  If you want to see the huge variety of art that a letter can inspire then please pop along and follow this link to Tag Tuesday!

Thanks for popping by x

Trash to Treasure - No 3 Continued......


As I suspected it took a while to get this little tutorial edited, finalised and uploaded to You Tube!  So here is the card I made using the same techniques I used on the box in my last post.  I have repurposed some old jeans and used scrap paper to print my images on for the image transfer technique.

On Friday I taught my class how to make these cute flowers using white sheeting which we stamped with a background stamp using distress ink before gathering it up to make a frilly flower.


I love making these flowers as they are quick and easy and really pretty.  Just think of all those scraps you have lying around or before you put the old clothes out for recycling I am sure you could use hubbies old stripy shirts!!!  A nice way to preserve a child's pretty dress on a layout too.

And here is the video tutorial of how I made the top card on this post which features 'a how' to for the image transfer technique and how to make the denim flower. Hope you like the video tutorial and try out the techniques for yourself.


The top card is the card I am giving away on my next Trash to Treasure post in 2 weeks time.  All you have to do is leave me a comment either here or on my previous post to be in with a chance of winning.

Thank you for popping by X

Monday 11 February 2013

Trash to Treasure - No 3

I really wanted to start this post by thanking everyone that has left me such lovely comments over the past week.  You have really confirmed to me how much I love to craft and how wonderful this blogging malarky is.  Who knew a year ago when I started blogging how addictive it was and that is really down to you, all my fellow crafters out there in what I think of as a virtual community.  Everyone has been so willing to help when I didn't know how to do so many things but best of all is the sharing.  I know it might sound a bit soppy but I think you will agree with me there is such a generous sharing of ideas and knowledge, sharing of art and inspiration and a willingness to encourage and support out there and that spurs me on to try harder to make beautiful things.  I might not always manage it but I really enjoy the trying!  Thank you to everyone that has liked what I have been doing here on my blog enough to follow me.  I still check out my statistic page and colour in my map each time a visitor from a new country pops up.  How cool it is to have coloured in 68 countries to date.  I have been brushing up on my Geography and thank goodness for the internet or I would still be searching the atlas for the whereabouts of Kazakhstan.......ok ....... and lots of other countries I only vaguely knew where to look for!!!  I have just spotted Moldova on my list of visitors and I will have to look that one up too!!!  I still need a visitor or two from Alaska though as that is a major colouring job!!! ;-)

Now as I suspected when I decided to do a regular Trash to Treasure post it is going to be two weekly!!!  So without further ado my trash this week was old jeans and this is what I did with them.


The jeans have been torn into strips, frayed and fashioned into flowers and ribbons!  As I wondered how to use the flowers I had a huge pile of very large flowers that were in need of a storage solution sitting on my desk and I had this box (actually it was a set of 3 nested boxes I bought some time ago) and decided to make a pretty home for my pretty flowers kindly gifted to me by my friend Barbara.


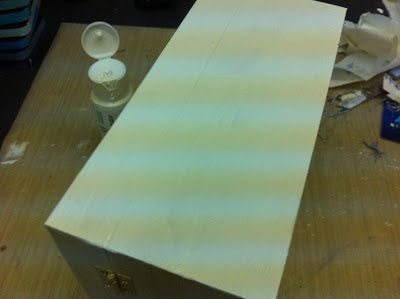
I white washed my wooden box with acrylic paint liberally thinned with water.  Just to make sure that the wood colour was toned down a bit as I wanted to try out an image transfer technique on a 3D object rather than the flat ones I have done this on before.  That is when the Trash to Treasure ethos popped in to my head and I decided to print my images on to unused instruction sheets that I have left over from previous classes I have taught.


So I found a lovely blue and white Toile image on the internet and I  printed out several sheets (ink jet printer) on my recycled instructions!!


Then working on a side at a time I trimmed pieces of my toile print roughly to size and then you need to work fairly quickly for step one of this technique.  Liberally coat the piece with acrylic paint - I am using white as my print has a white background.  Work quickly and evenly coat the side with a thick coat of paint.

 Next press the printed image onto the side into the wet paint.  Have a piece of kitchen roll handy for mop up of excess paint and an old plastic card (gift card or similar) to gently at first press the paper over the piece and then being careful not to tear the paper smooth it out and against the side making sure you have good adhesion.  Then it is time to have a coffee and let it all dry.  You can use a heat gun if you want to speed up this process.


 When it is totally dry it is time to wet it again!!!!!  I use a paint brush to coat the back of the paper with water and leave it a minute or two to soak into the paper.  Then use your finger to rub the paper and gradually remove the top layer of paper to reveal the image below.  If you have not done this before then be careful.  If you rub too hard you will remove the image entirely.  Gently does it.  There will be bits that don't work but don't worry as this adds to the shabby chic look and the over all charm of the image transfer.  There was a slight problem using the recycled paper in that the black ink did start to bleed.  I manage to avert disaster by rubbing away from the revealed print so as not to transfer the ink back on to the transferred image.


Let your image dry out again and then take a piece of kitchen towel and gently buff off any large stray bits of paper peelings.  Then carry on working to cover the entire box.  This technique is messy but I think it is worth it.


Here is the outside finished.


And then I used more of the printed paper cut to size and glued into position to cover the inside of the box as you can see here.  


I inked all my edges with Chipped Sapphire Distress ink.


Including the inside edges  and then gently sanded the whole piece to shabby it up some more.


And here is my finished Trash to Treasure piece with its recycled denim embellishments.


and here it is filled with pretty flowers - perfect!  Gotta love a bit of gorgeous storage!!! (I am soooooo modest!!!! ;-))  I love this image transfer technique.

I am in the middle of making a video of this technique and using it on the card I am going to give away this on my next Trash to Treasure post.  I wanted to get this post up first as it is a bit long and I will post the card with video later today or early tomorrow dependent on You Tube upload times.  So if you want to win the as yet unseen card then please comment on this post.  Have you tried this technique?  It is a bit messy to do but I think it gives a lovely result and I hope you like it too.

I have done the draw for the Trash to Treasure No 2 card and the winner is.........

Eliza!!!!

Thank you Eliza and to everyone that took the time to comment I really do appreciate it.

That's it for this post.  Pop back later to see the card you could win if you leave a comment on this post.
Hope you enjoyed this Trash to Treasure project and try it out for yourself.

Thanks for popping by x

Saturday 9 February 2013

Ever After Challenge

Tinkerbell Card - Make a Wish!
Guess what I was doing yesterday!!!???  When I saw this weeks Simon Says Stamp and Show challenge I knew immediately which fairytale character I wanted to put on my card.  I love the idea of fairies and there is one fairy in particular who is cute and sassy and here she is!  Bonus point that she wears green which is my favourite colour.  I made my challenge piece at our crop and I was asked a few times who my card is for and I said .......well actually I think it is for me!  I am going to put it on my wall ;-)  I thought you might like to see how I put this one together.


I made a card 5 3/4" square with black card stock.  Quite a heavy weight card stock as my intended embellishments are heavy.  I cut some Tinkerbell green card stock at 5" square and then stamped it with flowers using Tinkerbell green Ink.....are you sensing a theme here :-)  Ok it was Peeled Paint distress ink and the stamp was a flowery background stamp from Hampton Arts.


I inked the edges of my card and then mounted it on my card front and then got to work with this little pearl maker.  I have had this for a while in my stash and it was the first time I tried it.  I have to say it was quite easy to use and the pearls looked just like the real thing when they had dried.


Next I cut a square of white card at 4" followed by a square of black 4 1/4" which I layered on to my card.  That's not a white square I hear you say!  I cut an inch strip off the side of the square and here is what I did with the rest of it after I trimmed an 1/8 off the long edge....


I have a very lovely book that I treated myself to that teaches you step by step how to draw fairies!


Here is my step 1


Step 2


 Step 3


I then added the colour with my Peeled Paint distress ink and outlined her with a black pen (forgot to photo this bit)....too busy chatting!


Then I took 3 little bottles - Why are tiny things so darn cute??  I filled them with fairy dust (glitter to us mere mortals) and added labels and ribbon.  I stuck the wishes to my card with Pinflair glue gel, made a 'Make a Wish' label and added a Making Memories enamel charm in that fabulous green colour!!!  A couple of touches of glitter in Tink's hair and here is the finished result

Tinkerbell!

I am off to my crop again now - how lucky am I two days to ....well...... mostly chat, drink coffee and eat cake with my pals but now and again we do do a bit of crafting as you can see.  I am going to work on a layout today.

But before I head out I would like to say a really big thank you to everyone for their lovely comments on my last last weeks Simon Says Stamp and Show Challenge.  I  was bowled over especially this morning when I logged on to make this post and found lots more lovely emails and the fab news of making the top three!!!!!  So cool  -  a big big thank you everyone.

If you are just happening by this way and want to see what wonderful things a good challenge inspires then follow this link to see more Ever After inspired works of art at the Simon Says Stamp Show Challenge Blog.

Hmmmm I suppose I had better get dressed before I head out to my crop ;-)

Thank you for popping by X
Related Posts Plugin for WordPress, Blogger...