Sunday 29 April 2012

Video Case Stamp Storage Tutorial

Finally I get this tutorial finished!  I know that some of my friends will be interested in this one as they saw my first video case when I made it.


The one in the centre is the one I made for the tutorial.  More lovely Graphic 45 papers.  I glossed the cherries (top right) and you can see they were not dry when I took this photo!!


The red one on the right of this photo was my first design and then I made the Christmas one on the left.  They are quite addictive once you have made one as they are easy, very useful and pretty too!  Imagine them made in the papers you love.


Here they all are side on.  I have fixed the flower that has slipped on the spine of the one that was hot off the press!!  If you want to try this for yourself follow this link or click on the tutorial listed on the sidebar on the left.  Have fun making them your style!

Friday 27 April 2012

More Playing Cards!

As I have been learning to Blog I have been finding more and more interesting things that everyone is doing out there in Crafty Blogland.  I particularly love all the challenges I keep finding.  As anyone that knows me will confirm I love a crafting challenge!!!  It is like a creative workout - wish I relished a physical one as much.  I'd definitely be slimmer if I did :-)

I was thinking of entering a challenge I had spotted whilst pottering around in Blogland and as you know if you have popped in to visit me recently I have been working on card designs using up playing cards I had squirrelled away (for far too long to admit to!)  If you want to see the other designs follow this link and then this one!

Yesterday I started making a flower using larger playing cards.  I cut out petal shapes and threaded them on to a brad before shaping them and fanning them into a flower shape.  So here is another design using up playing cards and my entry into the April Challenge on the Truly Madly Crafty Challenges Blog which just happens to be Handmade Flowers!  Perfect.


Here is a close up of one of the flowers.  I love the way my flower centres worked out.  I had laid my design out and was trying to decide where I could put a greeting as there wasn't really much room when I thought I could put the greeting on the flower centres.  I printed out my greeting circles and cut them out before running my embossing tool around the edges of them the shape them into a cup shape.  I attached them to the flower centres and gave them a liberal coating of Glossy Accents.  


I have to do some work on my website today.  I have been putting it off as I am finding it hard to write the text.  I think I just have to do it and then update it if I need to.  Otherwise I am in danger of having a great looking website with no words at all!!  Stop stressing and start doing I think.  Wish me luck!

Thursday 26 April 2012

More Playing Card Designs

Yesterday I made a card using mini playing cards as I had challenged myself to use up some of the things that had been languishing in one of my drawers.  You know what I mean....the 'forgotten stash'.  I really wanted to make some more along the same lines as they were fun to design with.  So I did, and here they are!


Took me a while to stick the gems on this design!  It seems playing cards are a good bet (pardon the pun) for a mans card.  Why are men more challenging to buy presents for and make cards for I wonder?  ....And they get short changed when it comes to fashion choices too!


I had another go with the Cosmic Shimmer Pearls on this one.  Definitely still learning, my pearls are freshwater I think!!  Does anyone think the cards look like they are floating in the air?  If you are inspired to try using playing cards too.  Don't forget to pop by and leave me a link as I would love to see what you have created too.  There are lots of greetings you could come up with using playing card terminology I am sure. 

The first card I started with a greeting which led to a design and the second card started with the design first and then I thought about the occasion I wanted to send the card and wishing someone good luck seemed appropriate for cards somehow.

I am off to get started on another tutorial to add to my collection (see side bar on the left).  Thank you for popping by.  If you fancy signing up to follow my blog that would be fab as I love to see who might be dropping in to visit me from time to time.

Wednesday 25 April 2012

WOYWW 151

Hello to all my WOYWW friends.  I am wayyyyy down the list today I see.  For anyone not in the fabulous WOYWW club then follow this link to find out more.  You're gonna love it!


So here is what is on my desk today!  At the very top of the picture is a layout that is waiting for inspiration to send me a title and some journalling.  And at the bottom is some of the bits and pieces from the drawer I showed you last week and I have to confess the card I made in order to rise to my own challenge set last week was made this morning!!!  Oh......and the biscuit is now only a wrapper.....I recommend this new honeycomb flavour Club, yummy!

I didn't get any further with my challenge than this though I did put a couple of bits from the drawer into a bag ready to go to my friend Wendy for her craft group.


Here is the card that used up a couple of the mini playing cards I had in the drawer.  I think I have to practice a bit more with the Cosmic Shimmer Black Pearl stuff as my pearls are not very uniform in shape.  My first blob is the biggest one - as you can see!  Now I have to put it somewhere safe until they dry as I almost couldn't eat my biscuit as I laid it in a blob of the stuff I had made clearing the nozzle!  Good job the wrapper was still on!  Maybe I will get a bit more time today to make a few more playing card designs as I quite like this one.  Could suit that most difficult of card customer - Men....possibly cool enough for a teenage boy even!  What do you think?


I was going to crop this photo of my layout and then I spotted my tripod.....I mean pink fluffy feet!  Do they detract or add to this layout I wonder.  That's it from me this week.   I am off to get a coffee and then I will be back to travel the world catching up with my WOYWW pals.  Oh, and if my sister-in-law passes by this way HAPPY BIRTHDAY!!!!

Monday 23 April 2012

Scrap History

No TV for a couple of days as the puppy has chewed through the satellite cable!  So this morning instead of sitting in my PJs having a leisurely breakfast in front of the TV I am dressed and getting busy!

Just putting a few layouts away in my craft room and I started to flick through my albums and spotted some layouts from when I  first started scrapping about...I think 4 or 5 years ago.  Now I really wish that I had written on the back of my first ever layout as I can't be sure which one it is.


In those early days I went to a local hobby shop to find something for card making and I was chatting to Rachel (of Hobby Horse Crafts) trying to find out more about the scrapbook layouts she had in her shop and that is where it all began.  I booked in to my first crop and I go there still.  As you can see from the layout above I didn't have the array of embellishments I have since lovingly collected so I made some of my own!  I also didn't like to spoil my layouts by writing on them!!  All of my early layouts have the journalling printed out from the computer.


I remember that I used to go to the shop with a collection of photos in hand and stand for ages in front of the bazil rack picking just the right shades of paper to go with my photos!  More handmade ski embellishments and printed journalling on this layout and the title was way before the purchase of my Cricut or its invention come to that!   I remember learning to print out the title on the computer in outline mode and to flip it horizontally.  I then spent many hours cutting the letters out by hand...That is the kind of detail that future readers of our scrap books will miss out on.  The how did we do that.......?


This is a recent layout which I think shows my confidence with patterns and colour has grown as has my stash and I have hand written journalling too!  Oh and a Cricut title - so much quicker.  


I have always liked to make interactive layouts and this one has a tag in a pocket and a flap for extra photos (a technique picked from my pals at the crop I go to as I remember).

These pictures are of my husband and I when we first started courting.  I was just a baby at 18 - I can't believe that these were taken 32 years ago!  

Yes I think I definitely am going to write notes on the back of my layouts in future.  I think the love and care we all put into recording our memories for the future are evident in out layouts to anyone that looks at them but I think people will be interested in finding out about the scrapbooking skills, tools and materials we use too.    A little history of scrapbooking trends.

I can hear Comet calling to come in so I think I might go and give him a pat for getting me up and doing so early today!!  I better do it now before the bill from the man coming round to fix it today :-)  Thanks for popping in and hope you have a great day XXX

Wednesday 18 April 2012

WOYWW 150

I've had a busy week doing more prep for my classes on Friday (almost finished) so my desk is full but I decided to go to the neat end for my photo where there sits a layout waiting for its final tweaks (its for a scrapbook to document a fundraising drive at my son's gymnastics club), a badge I made for a little girl I know that loves to craft too and the rose prints for my final card which I will complete tomorrow.


Last week I showed you the treasures I stored in my printer drawers and this week I thought I'd open my Ikea drawers.  I love these drawers as they are so versatile and cry out to be decorated.  Why did Ikea discontinue them I wonder?


On the top of the drawers is a prima butterfly and a heart shaped stone (from hubby).  Top drawer has ink pads that I don't use very often, middle drawers are paper flowers and metallic threads and the bottom drawer stores away the kind of things you pick up and think I will use them one day!! There are 3 tins and playing cards, interesting clothing tags, a friends old metal belt, 5 old brass stencils (the kind we used to use a light box with) one of them is still in its packet!  A packet of laser cut seashells in pastel colours, Very, very old letraset letters, a freebee christmas embossing board, pack of christmas tree post it notes and a blank wooden door hangar.


And then........tucked neatly in the bottom of the drawer 3 shape cutting templates not used once and all these also brand new never used metal templates and stencils.....I feel really guilty now.  I had filed them neatly away and forgotten all about them.  How naughty is that.  I am going to challenge myself in front of witnesses (anyone popping in!!) to make something with something in this drawer to have on my desk next week.

Well that's me feeling bad but I know what to do to cheer myself up I am going to pop over to Julia's and visit with my fellow WOYWW folk.  If you don't know what is going on then follow the link you're gonna love it!

Tuesday 17 April 2012

Following the Rainbow.... Again!

I am on a roll.  I am supposed to be finishing off my card packs and instructions for my lessons right now and I had had another rainbow and ribbon idea - just had to go with it......


First I made rainbow ribbon paper!  I cut a 5 1/2" square of card and covered it with a 6" square of double sided adhesive sheet which I covered in strips of scrap ribbon following the colours of the rainbow.


I trimmed all the ribbon ends and used the excess adhesive sheet to wrap them neatly around to the back of the card square.  I mounted this on the front of a black 5 3/4" card with foam tape.  I attached a 3 1/2" circle of black card to the centre of my ribbon square using glossy accents.  I then cut out 14 flowers using my well loved Tim Holtz Tattered Floral Die (smallest flower).  I used a pearl embossed card.  I shaped them and created a ring of flowers around the edge of my circle of black card.  I used pinflair glue gel to make sure the flowers don't pop of the ribbon later!


 Almost done..... 14 flowers meant I could add gems to the centres of each flower following the colours of the rainbow again (glossy accents to secure).


Quick search on the internet for another Rainbow quote and my card is finished as is this very quick tutorial.  I used a white Signo pen and then added the colour with my pro markers.  If you don't have enough ribbon scraps you could do the same design with paper strips.


And then what did I do with the scraps of my ribbon scraps......only kidding .......I put them in the bin of course!!

All this rainbow inspiration reminded me of a layout I did in June 2007.  It was inspired by a scrap lift challenge in a scrapbook magazine as I remember.  I didn't buy anything for this layout I just raided my stash of embellishments and sprinkled them liberally on my rainbow!


I hope my rainbows bring you inspiration too - they seem to be the perfect way to use up some of that lovingly collected stash!  I am off to make up the card packs and instructions for a card that I am teaching at my class on Friday which was also inspired by my blog post on Sunday.  Thanks for popping by!

Monday 16 April 2012

My Blog Map

Just a quick post today and then I am back to finishing off the last two card designs for my class on Friday.  


When I started blogging a couple of months ago I was really excited to find the statistics area of my blog that told me where visitors that pop in to my blog live in the world.  I still check in with my statistics and colour in my map and thought you might like to see it!


As you can see I have been busy with my pro markers over the past couple of months!  It is doing wonders for my geography too.  I have to keep looking up where places are!  I have my latest two countries to locate and colour in and I have just noticed I haven't coloured in Mexico.

It is so exciting to me that we have a world wide crafting community all sharing their creations and inspirations and just chatting to one another.

I just wanted to say a big thank you to everyone that takes time from their busy day to visit and read my blog.  I really appreciate it.  Thank you to those of you that like it enough to follow my blog.  I love thinking of things to chat about or to make to share with you all so my stats and my follower areas are a cool ways for me to see if I Blog anything of interest to my fellow crafting pals out there.

Finally....... Anyone have any crafting pals in Alaska or South America?  :-)

If you ever want to ask me anything or just chat please leave me a comment.  Have a lovely day and I hope you get time to play with your craft goodies. 

Sunday 15 April 2012

USE IT UP!

I was wondering what to blog about today.  Sitting here waiting for inspiration to strike I saw a project I made many moons ago at the crop I go to.  Actually the crop and the lovely ladies that go there are the ones who really got me hooked on all things paper crafting.  The first time I went I had only ever made a few cards and was looking forward to seeing what scrapbooking was all about.  I went armed with a few tools and some photos and carefully chosen papers and the rest is history!

So if you are reading this.... and you know who you are.... it is your stash that led to my stash!!

Talking of stash one of the things I made at the crop in those early days from my quickly expanding papers and trimmings was a scrap bin.  I think I would call it my first ever altered item.  We were all having fun making them from Danielle's old baby milk tins!  Mine wasn't used for rubbish for very long before it became the receptacle for all the tiny scraps of ribbon I just couldn't throw away...


I thought I would blog about it and one thing led to another.  I suddenly realised when I was tidying away further bits of ribbon that I had collected that I very very rarely do anything other than put stuff in my pretty tub and so I get to the subject of my blog entry today....I got there in the end.  Today I am going to USE IT UP!


Tub opened and just take a look at what I found inside.  I had forgotten about some of the 'not ribbon' scraps I had stashed inside.


I had an idea as I looked at the tangle of pretty ribbon scraps and I decided to make a rainbow!  Well one a bit neater than the pile you see before you.


So here are the ribbons I sorted out in the colours of the rainbow.  I confess I had to make a couple of bits the right colours but I did so by colouring lighter scraps with my Pro markers.  (No new ribbon was cut in the making of this project!!)


I made a white DL card using quite thick card as I wanted it to be able to support the ribbon rainbow I intended to make.  I made the rainbow by cutting two half inch wide strips of card and sticking them together with DST and then I tied scarps of ribbon around it reciting  Richard Of York Gave Battle In Vain in my head as I knotted and trimmed!  Then I looked for a suitable quote on the internet - thanks to Dolly Parton and here is the end result.  

So now I am sat here feeling pleased with myself I have a blog entry about something I know you will relate to as you save a bit of this and a bit of that incase it comes in useful.  Then, if you are anything like me, you forget to look at the scraps in favour of making more scraps!  So I am going to see if I can think of something else to do with some more of the bits of ribbon before I put on the lid of my ribbon scrap tub and put it neatly on my shelf once more! 

Thanks for popping by.  If you have any ideas for me to USE IT UP then please let me know I'd love to make room for more pretties!

Wednesday 11 April 2012

WOYWW 149

Busy, busy, busy!  I had extra time between classes this month because of the Easter break and here I am rushing to get ready for next week.  So that is what is on my desk this week - class preparations.  I don't even like the feeling that I am rushing to get ahead again so why do I do it time and time again!!  The more time I have the less organised I am.

My fingers are dusty and painty today.  I am going to do a bit of image transferring with my class this week for the first card of each lesson.  I know this technique is a bit hit and miss sometimes but that is the beauty of it.  It is not for the neat crafter as you can see from the pile of paper peelings on the right of my craft mat.  I did tidy them up a bit for the photo so I didn't look too much of a craft slob!!


I am using photos from the garden for my iris card which is nice.  I have a good shot of a rose in full bloom  next to a rose bud which I think I might use for my third card.  You can see the first card samples ready to go that are propped up on my tool tidy.  I am wondering what to do for the second half of the lessons.  I think I will stick to the flower theme but that is as far as I am.


I am halfway there with my second set of samples so I will spend the end of the day today making up all the kits.  If I try really hard I might get ahead again over the next two days........Mmmmm

......I suppose it does depend on how much time I allow myself to indulge in peeking at the desks of my fellow WOYWW folk!  Thanks again to Julia for being our hostess with the mostess......and thanks to you for popping in.  

Sunday 8 April 2012

Happy Easter!

Happy Easter to all you crafters out there!  I hope you are having a lovely weekend no matter what you are doing.

I love the 'idea' of decorating the house for Easter and have done ever since I lived in Germany and saw the beautifully decorated Easter branches and displays in folks houses over there.  I have made lots of different Easter decorations over the years and this year is no different.

I decorated a few more eggs to add to my Easter display.  If you like them and want to have a go yourself you have the whole year to get around to following this link to the tutorial for them!!  I put pictures of my boys in my eggs but you can put other things like the Easter Bunny in them if you like.

I think we will have pears this year!  
As you can see from my photo we have a bit of a damp start to the day...look out for the muddy paw prints of the Easter Bunny!

As I said before I have made lots of Easter themed craft items over the years but I do have one problem though..... I always forget to get them up in time to enjoy them!  I always end up putting them up during the Easter Weekend and then I have to take them down again almost straight away!  I really need to be more organised!

I am off now to send my son clues on his mobile for an egg hunt!  I hope I can remember where everything is for our high tech treasure hunt.

Thanks for popping by and I hope you all have a lovely weekend where ever you are in the world......Can I smell chocolate?.......

Wednesday 4 April 2012

WOYWW 148


Trying desperately to finish off my tags for Laura Dennison's tag swap.  I'm on the second batch now.  I kept to the same layout as my French Country version but now I am in Shabby Chic mode!  I think I should get a new cutting mat as this one definitely pre dates the invention of the wipe clean messy mat I have on my desk below!!  Each blemish is a record of a crafty creation so maybe I'll keep it after all!


My other job on the desk today is sorting out my printer drawers.  I love sorting my crafting stuff!  Strange I know.  I bought the drawers a few years ago now and I really wish I had bought more.  I bought them from an auction (the only one I have ever been to) and I thought I had bought 10 sets of drawers complete with letters for £40.  Turns out I bought one with the option to buy the others (£400 I definitely wasn't planning on spending)!  As you can see they are perfect for storing little bits and pieces.  I am sorting things into colour groups again as they have gradually gotten more and more mixed up over time.


 All tidy again.  I thought you might like to see what is in the bottom drawer......


I kept a selection of the letters that were originally in the drawers that were the larger fonts.  I can actually print with them.  They are very heavy.  I wrote all the letters on when I sorted them out but the circle stickers on the trays are original to whoever set the printing press long long ago.

Thanks for popping by for a visit.  I am off to post this on Julia's Blog if you want to follow me there to find out what this WOYWW is all about.  Then I will follow the links I find there to pop in on your desks wherever you are.  Happy WOYWW to all.

Tuesday 3 April 2012

12 Tags of 2012 - April

When I participate in Tim's 12 Tags of 2012 I can be sure of the following things:

1.  I will learn something.
2.  I will want to go shopping.
3.  I will get creative.
4.  I will enjoy myself.
5.  I will end up with very unladylike fingers!

So thanks to Tim for all of the above.  Here is my version of Tim's April tag.


As you can see I had the bird in the cage die and I made romantic love birds for my spring tag.  I did my best with the background technique as you can see below.  I wanted to use my Mustard Seed Distress Ink as I haven't used it yet so I used it instead of the Wild Honey.  I didn't have a suitable embossing folder to make a frame so I stamped my script and then tried to make my own embossing plate with a Kay and Co chipboard frame.  First time through the mangle and it was too thick and it ripped the card.  Then I had that 'What a silly thing to do" feeling when I realised I had well and truly stuck the frame to my Cuttlebug plate!  I tried to peel it off and the chipboard split into layers and then I had a 'Eureka' moment.....I tried embossing again and the peeled thinner frame worked much better.  


It took me ages to get the residue of the frame off my cutting plate and then I realised I should have used it a couple of times before I ripped off my unique embossing frame!  I think that was my dumb moment....
My embossed frame stood out more as I blended the Distress Inks over it and even more when I tapped the tag into the spritzed water.  So EVENTUALLY I was quite pleased with the effect!


I wanted blossom on my spring tree branches so I took some mini paper roses I had in my stash and took the centres out of them.  I rubbed them with some Mustard Seed Distress Ink and then spritzed them with water which spread the colour nicely.

So thanks again to Tim for the fun and the messy inkiness of it all!  I probably should have washed my hands before I typed this.........


Monday 2 April 2012

Home is Where the Heart Is Hanger Tutorial

Inspiration is a funny thing.  This plaques inspiration was a card I designed so I could take part in a Grungy Monday challenge and this plaque will no doubt lead to another crafting project.  Inspiration is infinite...... thank goodness!

I think I might have to make myself one now!
I have put up a tutorial if you want to have a go at making my hanger.  It is a great way to use up a tiny bit of your scrap paper.  

Is that what the term scrap heap was invented for?  I certainly have a pile of carefully sorted paper bits that I just couldn't throw away that could definitely be termed heap!  The trouble is it seems easier to add to it than actually use it. I wonder if there is a crafter out there who controls their scrap heap to a manageable level?!  I would love to hear your tips for what to do to shrink the heap quicker than it grows!

The weather has gone chilly today so I have the perfect excuse to put the kettle on and settle down to some crafting fun.  I am going to start my second set of tags for Laura's swap as I need to get them in the post although Tim Holtz has put up his April Tag to inspire so I am torn.  I'll just have to sit here rake out my scrap heap and see where inspiration leads me today.  

Thanks for popping by.  I hope I inspired you to get creative too!  You know you want to........

Sunday 1 April 2012

Swap Memories!

Today I have been busy making my tags for Laura Dennison's Tag Swap.  I have signed up to make two lots of tags and I am enjoying myself and remembering swaps I took part in quite a few years ago.  I believe it was when new things were starting to happen in the crafting world.  I went looking for the swap goodies I have treasured and they have helped me remember some things you may find interesting.  (I hope anyway!)

I would love to hear from anyone that happens by my Blog that was a member of the MSN Artsncrafts chat room.  It was a chat room that existed way before Blogging was invented.  We lived in Gibraltar in 2001 and the only crafting I was doing at the time was making things to decorate our home.  You know the kind of thing, making curtains and cushions, painting murals and decorating pots for the balcony.  I was quite heavily into dress making too as you may have read about already.  I remember finding the chat room by accident.  It was hosted in America and I remember thing how wonderful it was to be able to chat to crafting folk so far away.  I remember that the chat was so fast I could barely keep up.  Ladies took pity on me and slowed down to chat and to answer my questions on the new things I was hearing about.

It was about the same time I took up card making.  I made friends with one particular lady called Sweetpea.  I am sorry to say that I have lost touch with her.  We exchanged gifts and kept in touch with each other and I have looked out one of gifts which she sent to me to show you.   I asked Sweetpea about stamping into thick embossing powder.  It was really new to me and quite fascinating.  Here is a photo of the thoughtful gift that Sweetpea sent to me.  It was very artistically put together gift and was wonderful to unwrap.  It was a set of instructions, powders and examples of the technique.  I never used it as you can see.  I have looked after it though!

I can imagine the kinds of things Sweetpea might be creating today!
 The chat room organised several swaps and I took part in some of them and still have the treasures that came in the post from crafters across the water!  There was a St Patricks Day quilt square swap.  I hope someone recognises their work!

One day I will make this into a quilt!

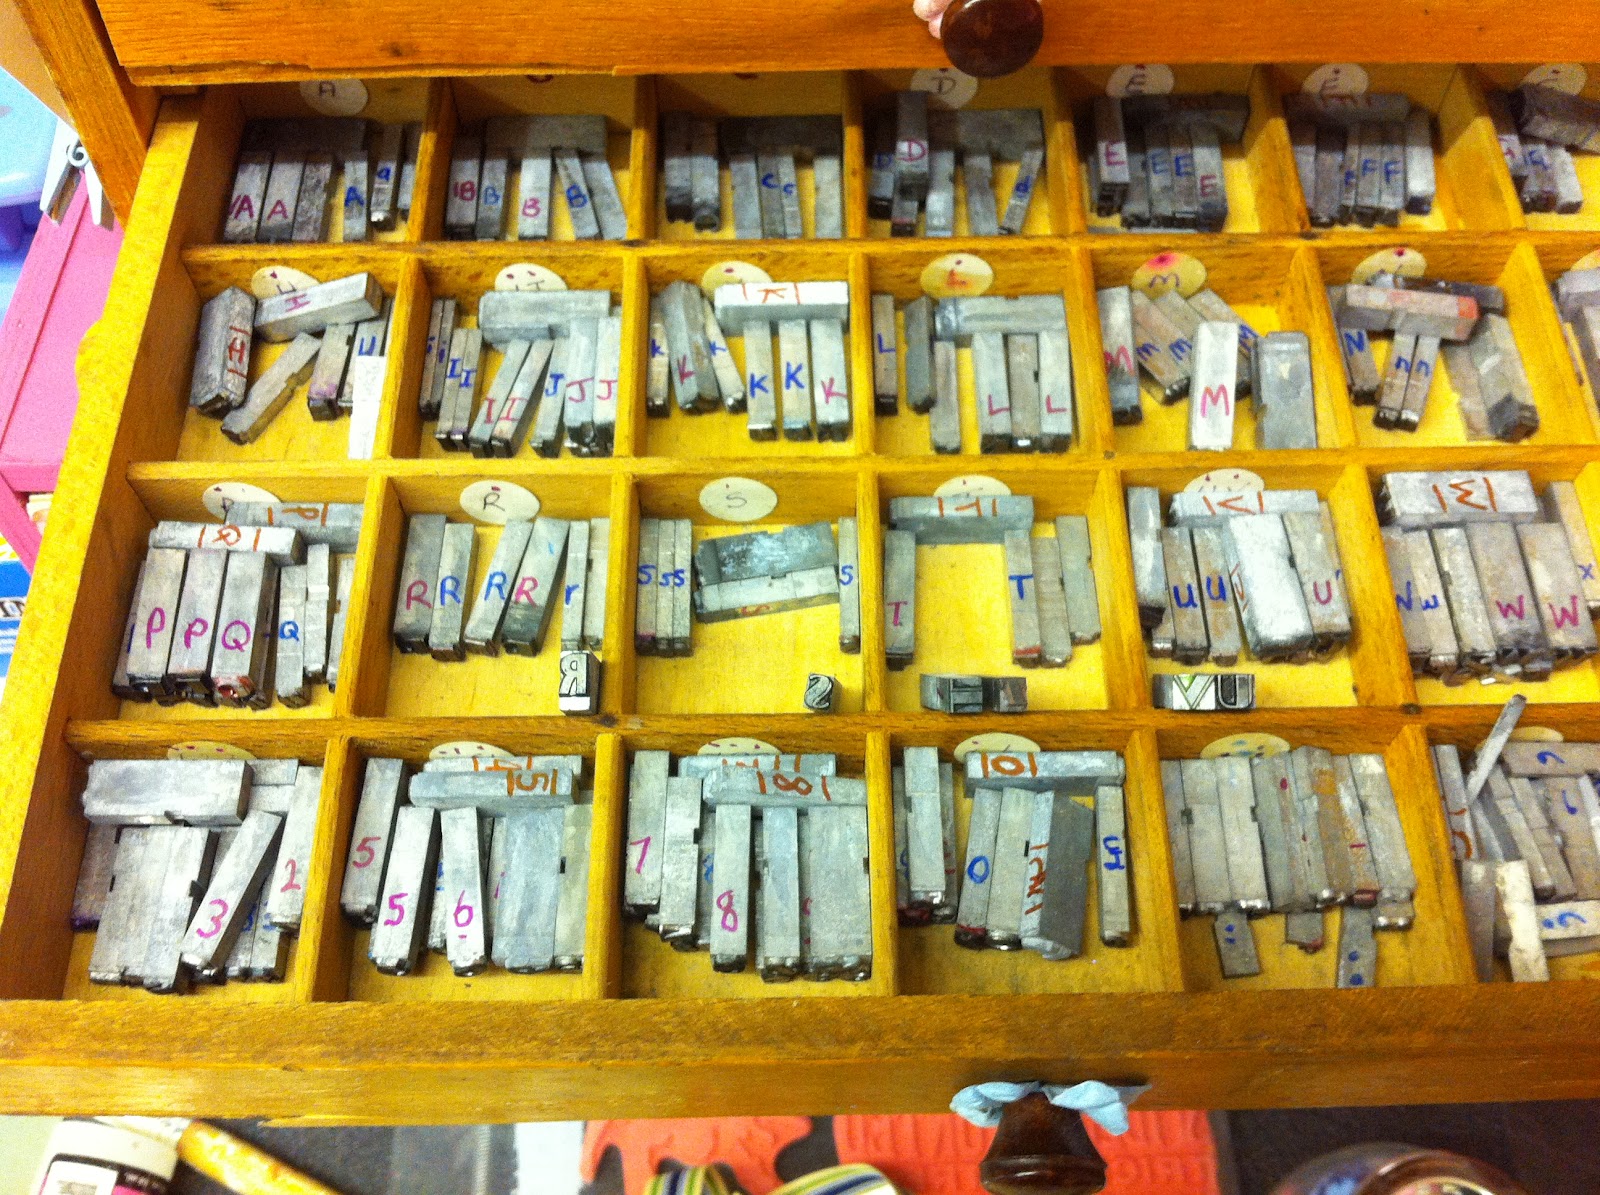
Then there was the shrink plastic charm swap.......That was scary as it was the first time I had used the shrinky stuff with a mind of its own!  The one on the bottom right-hand corner was mine!  I was known as Busybee in the chat room.
These little charms sit in my set of printer's drawers - can you see yours?
Here are some names; Handmaiden (Pam), Carol, Sandy Pants from Kentucky, E Bears, Susieq from Portland, Short-shrimp, Craftylady from Maryland, a couple of Busybees, Busyfingers from Nevada, Frog from Indiana, Craftymom from Oregon, Fizz, Honeybee, dsthreads, Itsa, Pamela from Arkansas,  Lois from Mi and of course Sweetpea from Illinois.  If you recognise yourself or your work I would love to hear from you.

I interrupted myself to go off to see if I could find the chat room I have been Blogging about.  I think I found it.  I definitely see things familiar and names I remember. WOW!  I am not sure if it is still an active chat room so I will attach a couple more photos and then I am off to see if I can make contact with my old chat room crafting pals!

One of the print drawers with the shrink treasures.
I think I may have found this lady and I am going to email her to find out if she sent me this all those years ago.  I bet her quilts are fabulous if she is still making them today.


That's the end of that walk down crafting memory lane.  I am also off to finish one set of tags and tomorrow I will get started on the other.  I am looking forward to receiving more treasures from fellow crafters around the globe.  Thanks for popping by and please leave a comment as I love to read them.

Related Posts Plugin for WordPress, Blogger...